The first look
When you insert the MEPIS LiveCD into your optical drive and restart your computer, the system will usually look to the CD-ROM automatically during the boot process, but in some cases you may have to enter the basic hardware system configuration (called the “BIOS”) by hitting the appropriate key (usually one of these: DEL, F1, F2, ESC, F10). The correct key for your system is usually indicated very briefly on the first screen you see during boot up. If necessary, check your computer's manual.
Booting the LiveCD
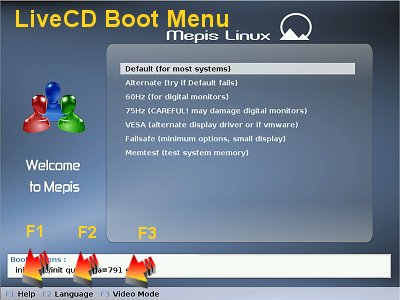
As the booting process begins, you are presented with a menu offering various choices. The default boot choice should work for most computers. Make sure to note the function keys at the bottom of the screen:
- F1 — Help. Provides important information and options:
- MEPIS Linux Information — origin, use and restriction of software.
- Using the Help System — navigation and function.
- Language and Keyboard Layout Selection — same as hitting F2
- Choosing a Screen Resolution — F3, see below.
- Boot Options — a list and explanation of some boot options available for specific situations.
- F2 — allows you to select the language/keyboard you would like to install with the OS.
- F3 — enables you to select your screen resolution. Most systems display settings will be automatically detected as MEPIS Linux boots, but in some cases, you may be required to manually select your display's optimum or desired screen resolution.
Note that the cursor is blinking down at the bottom of the screen at the end of a line of codes. This allows users to type in additional boot codes to change the booting behavoir. One that is often used, for instance, is aufs, which adds a read/write filesystem module so that software (a driver, for instance) can be installed and used during a LiveCD session. For other common boot codes, see under F1 above, or check the Wiki.
Login
When GRUB hands off the booting process to the Linux kernel, you will see a MEPIS graphical screen, called “Splashy”, with an expanding horizontal bar that indicates booting progress. If you hit the Ctrl-Alt-F1 keys together Splashy will be disabled, and you can view a terminal screen and read the booting messages on the screen. Sometimes this can be helpful in troubleshooting boot problems.
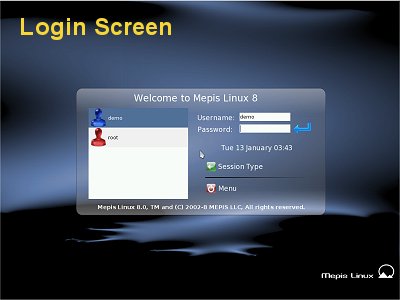
If all has gone well, you should be looking at a graphical login screen asking for a username and password; if you end up at a command prompt instead, reboot and use one of the other display boot options. For security reasons, MEPIS Linux is an account-based operating system, meaning that no program can run on it without a user account to run under, and any running program is limited to doing only things allowed to the user. For this reason, everyone must log in as a user that is known to the system through the action of the administrator ("root"). So you see on the MEPIS LiveCD login screen there are 2 default user accounts, "demo" and "root," each with its own password:
Please log in as the user "demo," who lacks the authority to make any system changes. As "root" you could accidentally alter or erase vital data without meaning to or even knowing it. In general, Linux users NEVER need to log in as root, since administrator level access is only a password away when operating as a regular user.
Introduction to the desktop
The MEPIS Linux Desktop uses the familiar point-and-click interface most Windows users are accustomed to, with a classic-style menu available by clicking on the MEPIS icon at the bottom left of the screen on the panel ("kicker"). Before we take a look at its major components, let's review some big differences Windows users will notice right away:
- Single mouse click replaces double click (e.g., to open a folder or run a program)
- Program names are different, but should be mostly self-explanatory. On the menu, you will find the programs identified by function (e.g., Audio Player) followed by its actual name in parentheses (e.g., Amarok)
- Harddisk locations. Drive letters are not designated with letters C: or D: like in Windows. Linux uses names like sda, sdb (or hda, hdb), and they appear either in /media (for removable media) or in /mnt (for permanent drives)"
- Drive names.
- Permanently attached storage devices like your hard disk drives are labelled by their connection type and partition mumber.
- Each physical drive's name begins with either hd (older computers) or sd (newer computers with SATA drives)
- The name then is assigned a different final letter for each drive of the particular type (so you might see sda, sdb, etc.)
- Finally, each physical partition is assigned a number
- Thus, for example, the drive name sda1 indicates that it is the first partition of the first SATA drive found.
- All permanent media appear in the filesystem under /mnt.
- Removeable media such as an external hard disk, USB thumb drive, digital camera or memory card of almost any type appear on the desktop as icons when connected that can be clicked to open the drives contents. All removeable media appear in the filesystem under /media.
- Permanently attached storage devices like your hard disk drives are labelled by their connection type and partition mumber.
Around the desktop
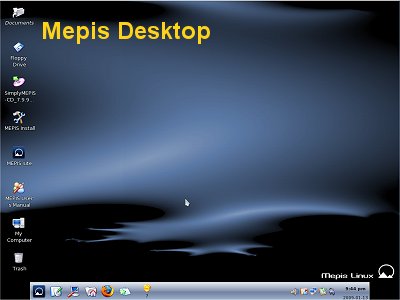
Here is a quick tour of the Desktop you first see (for details, see the User's Manual):
- Icons. Pretty self-explanatory, but let us draw these to your particular attention:
- My Computer. This new and very handy feature of MEPIS 8 provides a single location where you can find all your storage media, remote places, etc. If you dual boot, this is the easiest way to access your Windows files.
- User's Manual. Your basic guide to MEPIS Linux at your fingertips!
- Install. Click to start the install process.
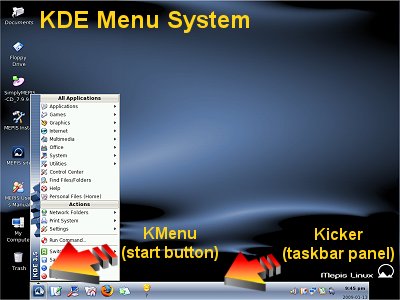
- Kicker, the panel across the bottom of the screen, is similar to the Windows equivalent. It is broken into three areas:
- Left side: icon tray. Contains the menu icon and any others that the user wants quickly available.
- Center: taskbar. Here is where running applications are tracked.
- Right side; system tray. Contains icons for various system applications ranging from the sound mixer to the calendar.
- Menu, opened by clicking on the MEPIS icon in the left corner of the panel.
- Most Used Applications--just what it says.
- All Applications*--contains all common applications installed by and for the user. Tree structure within large categories makes it easy to navigate to what you are looking for.
- Actions--links to common locations and actions.
*The number of applications supplied by default is limited by the space requirements of the LiveCD. From the excellent Open Office suite, for instance, only the word processor (Writer) and the drawing program (Draw) are included. But it is extremely easy to add applications after installation by using the package manager Synaptic to install whatever else you need or want. See the User's Manual for details.
Internet access
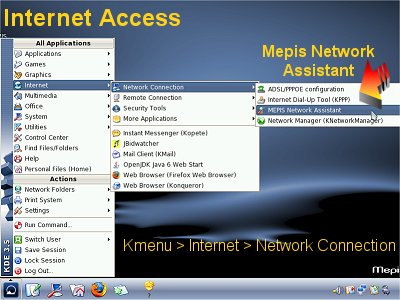
MEPIS Linux comes preconfigured for a standard LAN (Local Area Network), and wired access will work in most cases as is. For other forms of wired internet connection, please consult the User's Manual.
Wireless access may also just work, but often you have to put in the name of the network and any security information before you can connect. Click KMenu --> Internet --> Connection --> MEPIS Network Assistant, then the Wireless tab, and enter the information for the network you want to use. Be sure to click Apply, then switch to the Interfaces tab, make sure the wireless interface is selected, check the box to Start/Restart on Apply, and click Apply. More information available in the User's Manual, the Wiki, and on the forum (see How to get help).
Exiting the LiveCD
When you are finished with the LiveCD, click on the menu icon and select Log Out at the bottom of the list. This will bring up a screen that gives you a choice of ending your session and returning to the login screen you saw earlier, shutting down the computer, or restarting.