
By Dmitri Popov
OpenOffice.org has some powerful features that let you create custom solutions. For example, the Base application supports different database engines, such as MySQL, and it can connect and manage remote databases. The data from the remote database is then available for other OpenOffice.org applications, so you can, for example, access and manipulate database records directly from within Writer.
You can put OpenOffice's database access capabilities to some creative uses. For example, you may need a tool to informally store your research notes and text snippets. Several ready-made tools provide this capability; however, they do not offer direct integration with OpenOffice Writer. If you work in Writer, you may be looking for a simple web-based notebook application that submits data to a database. The versatile OpenOffice ecosystem lets you create such a tool.
To create a web-based notebook application - let's call it WNotes - you need to do three things: create a MySQL database, connect OpenOffice to the database, and create a simple web interface. First, download XAMPP (an easy-to-use version of Apache that comes with a MySQL database server) from www.apachefriends.org and install it using the tar xvfz xampp-linux-1.5.5a.tar.gz -C /opt command. Launch XAMPP with:
/opt/lampp/lampp start
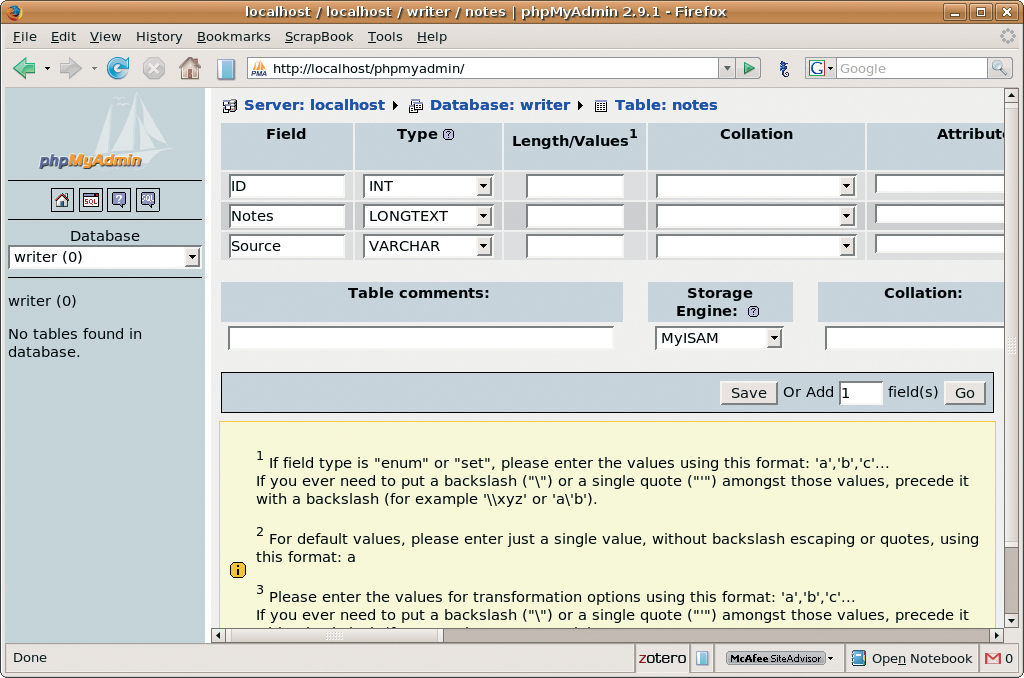
Once XAMPP is running, you have to create a MySQL database for use with WNotes. Go to http://localhost/phpmyadmin/, enter the desired name (e.g., writer) into the Create new database field, and press the Create button. Next, add a table and populate it with fields. Since WNotes is a simple application, the database needs only one table (e.g., notes) and three fields:
To create a table, enter the table name (notes) into the Name field, set the number of fields to 3, and click Go. Remember to set the ID field to be the primary key and select auto_increment from the Extras drop-down list. Also, specify the length of the ID and Source fields by entering the desired values (i.e., 10 and 255, respectively) in Length/Values.
Select not null from the Null drop-down list by the ID and Notes fields to make them mandatory, meaning they must not be empty. Setting the Source field to null makes this field optional. The SQL script in Listing 1 will create a table for you. To execute the script, select the Writer database, click the SQL tab, enter the script, and click Go.
| Listing 1: Creating the notes Table |
01 CREATE TABLE `notes` ( 02 `ID` INT( 10 ) NOT NULL AUTO_INCREMENT PRIMARY KEY , 03 `Notes` LONGTEXT NOT NULL , 04 `Source` VARCHAR( 255 ) NULL 05 ) ENGINE = MYISAM ; |
| Instead of XAMPP |
|
If you don't feel like using XAMPP, you can install Apache, PHP, and MySQL on your own Linux machine. If you are using Ubuntu, HowtoForge provides a detailed description of how to turn your machine into a LAMP server [1]. Most hosting providers include both PHP and MySQL, so if you have a hosted website, you can use it for your WNotes application. |
Next, connect OpenOffice to the new MySQL database. Since OpenOffice can't do this on its own, you must install and configure a driver. MySQL offers several types of drivers, and Connector/J (JDBC Driver for MySQL) is the easiest one to configure and use. First, be sure you have the Java Runtime Environment (JRE) installed on your machine and that JRE is added to OpenOffice. (Choose Tools | Options | OpenOffice.org | Java, and select the installed JRE.) You'll find Connector/J at the MySQL website [2]. Unpack the tar.gz package and move the resulting mysql-connector-java-x.x.x-bin.jar connector into your home directory.
In OpenOffice, choose Tools | Options | OpenOffice.org | Java, press the Class Path button, then click Add Archive, select the connector, click OK to save the settings, and restart OpenOffice. Now you can connect OpenOffice to the MySQL database.
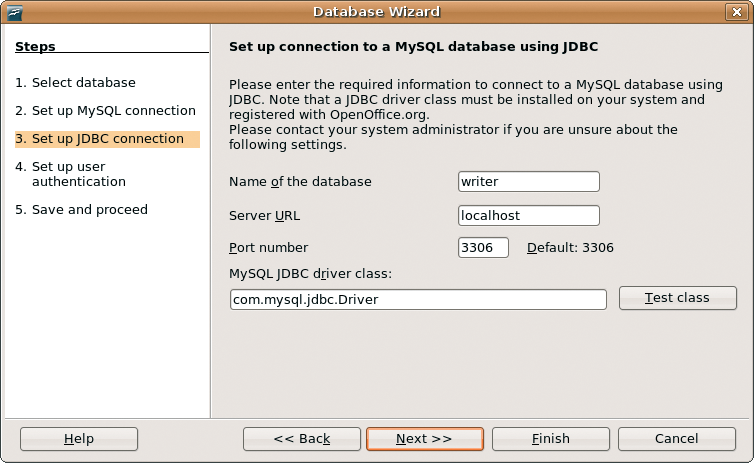
In OpenOffice, choose New | Database. In the Database wizard, select Connect to an existing database, select MySQL from the dropdown list, and click Next. Select the Connect using JDBC (Java Database Connectivity) option and click Next. Specify the name of the database (writer) and the server address (localhost) using the appropriate fields. To make sure the MySQL JDBC driver works properly, click the Test Class button. Once the driver has been loaded successfully, click Next. Enter the database user name into the User name field. If the user name has a password, tick the Password required check box (by default, MySQL in XAMPP uses root as the user name and no password).
You can use the default root account to connect and test the MySQL database, but change the root password and create a separate user account for the database. You can use phpMyAdmin to do so (Figures 1 and 2). To see whether everything works, click the Test Connection button. Click the Next button, select Yes, register the database for me option, and click Finish. Name the database and save it in your home directory.
To access and manage the connected database (or data source) from within OpenOffice Writer, open a new or existing Writer document and press F4 (or choose View | Data Sources). This opens the Data Sources pane, which includes a list of available data sources, including the newly created MySQL database. Use the + sign to expand the tree until you reach the writer.notes table. Select the table to then view, create, and modify records in the Records window.
There is a lot you can do with the data in the table. For example, if the database contains a text snippet that you want to insert into the current Writer document, drag it from the Notes field onto the document. Using the Data to Text feature, you can easily insert the records into the document as a formatted table. Of course, you can filter, sort, and search the data without ever leaving Writer.
The database needs a web-based interface, so you can add data from any computer with a browser (Figure 3). Since the XAMPP package (and most web hosting providers) includes PHP, you can design a PHP-based front-end for the database. To create a minimalistic interface that allows you to add new records and view the existing records, you need to create three pages:
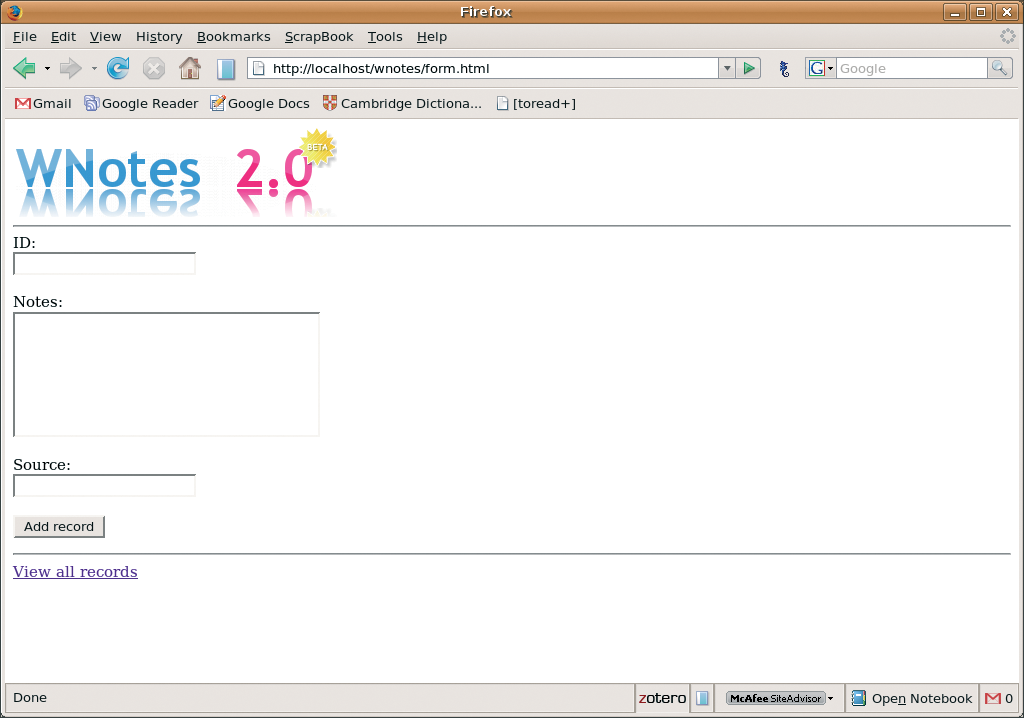
Create a new folder (e.g., "wnotes") inside Apache's document root (in XAMPP, /opt/lampp/htdocs) and move the created pages into it. Point the browser to http://localhost/wnotes/form.php and add a new record to check that everything works properly.
The created web interface is bare-bones. To improve it, you need a working knowledge of PHP. The PHP MySQL Introduction from W3 Schools [3] can get you started.
Secure the finished application to prevent anyone from accessing and entering junk data into your database. Using htaccess/.htpasswd files is the most straightforward way to limit access to WNote's web interface. There are many htaccess generators available onlline to quickly create the required files - from simple tools like htaccess Password Generator [4] to more advanced solutions such as htaccess File Generator [5]. You can also write an .htaccess file manually using the following code as an example:
AuthName "WNotes"
AuthType Basic
AuthUserFile /opt/lampp/htdocs/wnotes/.htpasswd
require valid-user
Use the htpasswd utility to generate the required .htpaswd file. Run the following command in a terminal window (replace user with the actual user name):
htpasswd -c .htpasswd user
Move the .htaccess and .htpasswd files into the Wnotes folder, and you are done. Next time you try to access the WNotes web interface, you will be prompted to enter a valid user name and password.
| Listing 2: form.html |
01 <html> 02 <body> 03 <form action="insert.php" method="post"> 04 ID:<br> 05 <input type="text" name="ID" /><br> 06 <br> 07 Notes:<br> 08 <textarea name="Notes" cols=41 rows=7></textarea><br> 09 <br> 10 Source:<br> 11 <input type="text" name="Source" /><br> 12 <br> 13 <input type="submit" value="Add record"/> 14 </form> 15 <hr> 16 <a href="select.php">View all records</a> 17 </body> 18 </html> |
| Listing 3: insert.php |
01 <?php
02 $con = mysql_connect("localhost","root","");
03 if (!$con)
04   {
05   die('Could not connect: ' . mysql_error());
06   }
07 mysql_select_db("writer", $con);
08 $sql="INSERT INTO notes (ID, Notes, Source)
09 VALUES
10 ('$_POST[ID]','$_POST[Notes]','$_POST[Source]')";
11 if (!mysql_query($sql,$con))
12   {
13   die('Error: ' . mysql_error());
14   }
15 echo "1 record added";
16 mysql_close($con)
17 ?>
|
| Listing 4: select.php |
01 <?php
02 $con = mysql_connect("localhost","root","");
03 if (!$con)
04   {
05   die('Could not connect: ' . mysql_error());
06   }
07 mysql_select_db("writer", $con);
08 $result = mysql_query("SELECT * FROM notes");
09 echo "<table border='1'>
10 <tr>
11 <th>ID</th>
12 <th>Notes</th>
13 <th>Source</th>
14 </tr>";
15 while($row = mysql_fetch_array($result))
16   {
17   echo "<tr>";
18   echo "<td>" . $row['ID'] . "</td>";
19   echo "<td>" . $row['Notes'] . "</td>";
20   echo "<td>" . $row['Source'] . "</td>";
21   echo "</tr>";
22   }
23 echo "</table>";
24 mysql_close($con);
25 ?>
|
WNotes is not the most sophisticated application, but it demonstrates what you can achieve by combining OpenOffice.org with other proven technologies such as MySQL and PHP. Using WNotes as a starting point, you can create virtually any type of web-based application and then access and manipulate data in it from within OpenOffice Writer.
| INFO |
|
[1] Building a LAMP server: http://www.howtoforge.com/ubuntu_debian_lamp_server
[2] Connector/J: http://mysql.com/products/connector/ [3] PHP MySQL Introduction for W3 Schools: http://www.w3schools.com/php/php_mysql_intro.asp [4] htaccess Password Generator: http://www.thejackol.com/scripts/htpasswdgen.php [5] htaccess File Generator: http://cooletips.de/htaccess/ |