Configuring and Managing Mediawiki 1.4
Community Effort
by Elisabeth Bauer
Configuring and Managing Mediawiki 1.4Community Effortby Elisabeth Bauer |
|
Wiki fans will be familiar with the scenario: you spot a typo on a website and drag the mouse around the screen vainly searching for the edit button. Until the inception of the Wiki principle, it was considered unthinkable for any visitor to be able to edit a Website. But now, projects like the free encyclopedia, Wikipedia [1], clearly demonstrate the viability of a collaborative effort involving thousands of volunteers. Many business and open source projects have put Wikis to effective use in areas such as software documentation, or simply as a means for organizing documents on an enterprise intranet.
If you are interested in setting up your own Wiki, you are spoiled for choice. You'll find over 50 Wiki engines in a variety of programming languages. Mediawiki [2], the software that Wikipedia uses, is a Wiki tool that has proven its value for over two years in a permanent production situation. This trial by fire has allowed Mediawiki developers to quickly discover and remove vulnerabilities, making Mediawiki one of the most stable and well tested Wiki options.
Mediawiki requires a functional Apache web server with the PHP module and a MySQL database. The Mediawiki management scripts need the PHP command line interpreter, which Debian users will find in a package of its own, php4-cli. To generate thumbnails of images you will be using with the Wiki, you might also like to install ImageMagick or the PHP graphical library, GD. Your web server will need to support PHP code execution.
Download the current version of Mediawiki from [2]. In this article, we will be using Mediawiki 1.4beta5. The final version of 1.4 should have been released by the time this magazine reaches the newsstands, so you may be using a slightly different version.
Log on to the console as root, and change to the web server's root directory; this is /opt/lampp/htdocs on XAMPP, or /var/www, on Debian. Once you get to the web server's root directory, you can type in the following commands:
tar xzvf /path/to/U
mediawiki-1.4beta5.tar.gz
to unpack the Wiki software in the current directory. The new directory that this step creates will later become part of the URL for your Wiki, so you will want to make sure you give the directory as short a name as possible, wiki, for example: mv mediawiki-1.4beta5 wiki. Change to the directory by entering cd wiki.
Then type
chmod a+w config
to make the web server configuration directory writable temporarily. After completing the installation, don't forget to make the directory read only again.
Now, launch the installation script in your browser: http://localhost/wiki/config/index.php.
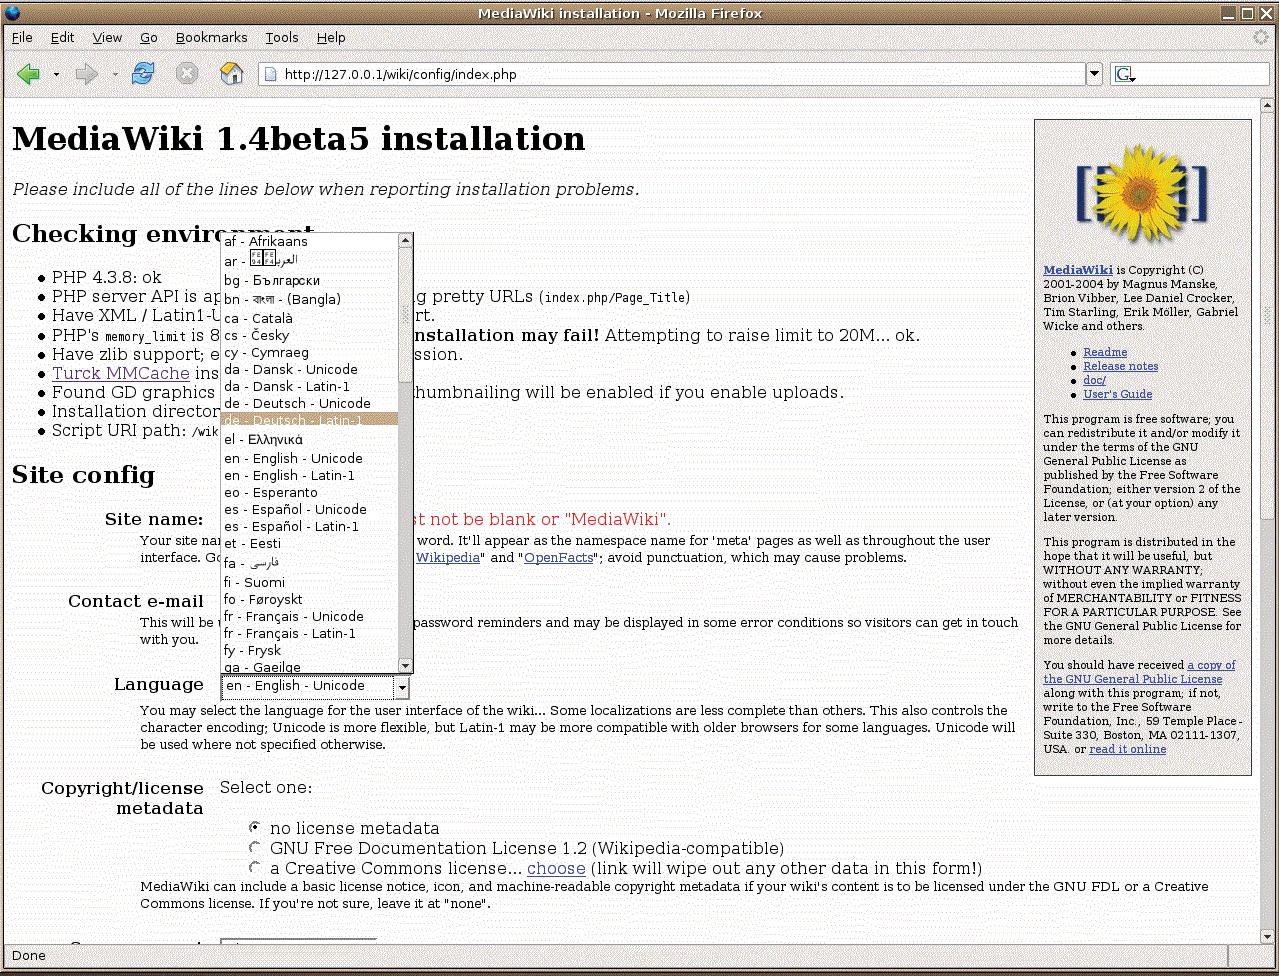
The script first checks the installation requirements. If you see an error message at this point, instead of the dialog shown in Figure 1, you will need to go back, then check and correct your Apache and PHP settings. You will also be able to see if the script has found either ImageMagick or the PHP GD extension for generating thumbnails.
Enter a name for your Wiki in Site name:. The Site name will appear at several positions in your Wiki as the project name, and Mediawiki will create a so-called project name space with this title - but we will be returning to this subject later.
The email address is the contact address for error messages. Use the language selection dialog to select the default language for the Wiki. Besides the interface language, you need to set character encoding. Setting us - English - Unicode allows users to add entries to the Wiki in foreign character sets without needing a workaround via HTML entities.
On a local network, the Wiki licensing information is not that important, but if you are running a public Wiki, you might like to think about the subject. The GNU Free Documentation License is a license for texts and other documents that was inspired by the GPL. The license allows free copying, modification and commercial utilization. The Creative Commons licenses allow you more leeway; for example, you can prohibit any commercial use and choose a version applicable to your location. Click choose to go to the selection dialog on the Creative Commons website, where you can put together a license that reflects your requirements. Mediawiki accepts your choice of license and displays a link to the license in the footer of every page.
You need to specify a user account as your Sysop account; the sysop will have extended privileges for the Wiki; the account name is arbitrary.
To accelerate Mediawiki, the installer offers to enable either Turck MMCache or Memcached - you will only want to enable these options if you have installed the cache software. Debian has packages for both. Turck MMCache is a PHP bytecode cache that is useful if you will be running Mediawiki on a single host. The Wikipedia server farm uses Memcached, a distributed caching system originally developed for Livejournal, which runs as a daemon.
The database settings are the final stage. The install script creates a MySQL user and a database. You can use the defaults in most cases. If you want Mediawiki to share a database with other applications, enter the database name, and then enter a prefix for the table name in Database table prefix, mw_ for example. This will avoid conflicts if another application uses tables of the same name (for example user).
Type your MySQL root password in the last field, DB root password. This is not the same as your Linux root password, and some distributions allow you to use a blank password.
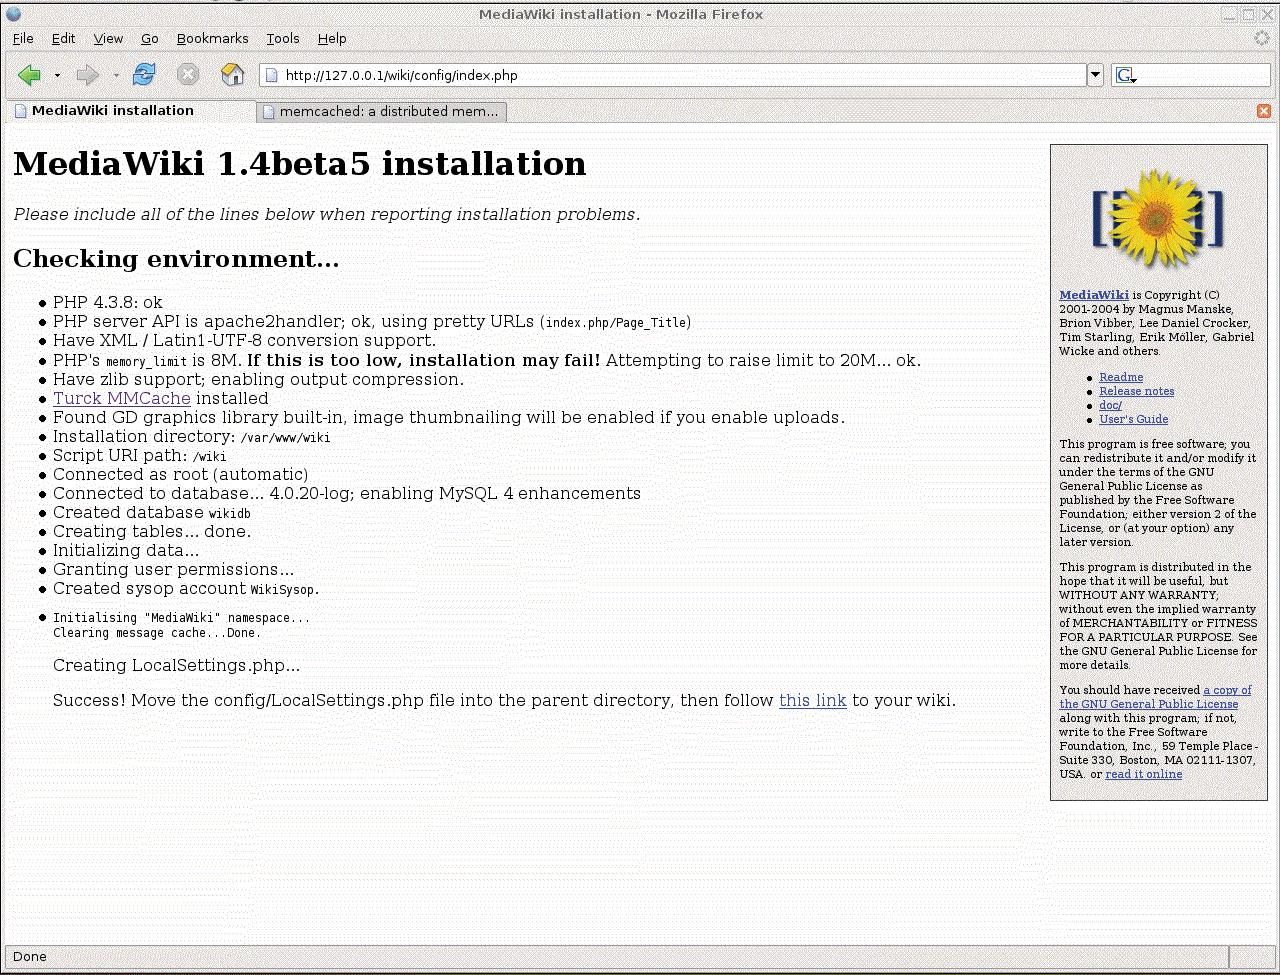
Now click on Install, and the script will create the database, the MySQL and Wiki users, and the LocalSettings.php configuration file in the config directory. If all of this works as planned, you will see a success message with a link to the Wiki in the last line.
Before you can visit your new Wiki, you will need to take a short detour via the console. In the Mediawiki directory, move the newly created local settings from the configuration directory to the main directory by typing
mv config/LocalSettings.php .
Your Wiki is now ready for use. The link displayed on your screen will take you to the main page (see Figure 2).
Clicking on edit in the toolbar at the top pops up a text window, which visitors can use to populate the page with content in Wiki syntax (see Table 1). This is just plain vanilla text with a few special formatting tags. Typing * at the start of a line allows you to create a list, for example, and you can put your text in two, three, or four sets of equals signs to use headlines of different sizes:
==Heading==
An empty line gives you a new paragraph. But the links are the most fascinating functions. In contrast to classical Wikis such as Usemodwiki or TWiki, which rely on automatic link detection based on CamelCase format, Mediawiki only supports free text links. Mediawiki converts the text between square brackets into internal links. Type
[[Testpage]]
and store your changes by clicking on Save page. Mediawiki will now display Testpage as a red link - clicking on the link will open another editor window, where you can edit a new page entitled Testpage. To link back to the main page, create a link called [[Mainpage]]. This link will be displayed in blue, as the page already exists. The Mediawiki manual has more information on creating pages [3].
As Mediawiki was developed with the encyclopedia in mind, it differs from traditional Wikis at certain points. For example, Mediawiki introduces the concept of namespaces, fixed prefixes that appear in front of the page title. There is a discussion page for each Wiki page, and a link in the toolbar at the top takes you there. Each user has a personal page (a link in Wiki syntax [[User:Name]], which allows a user to introduce herself or make notes. If someone leaves a message on a user's discussion page, Mediawiki informs the user the next time that user accesses a page. The software adds a descriptive page with an image prefix for images, and users can edit the page just like any other Wiki page.
Users can create and edit pages in the Template namespace. {{Title}} allows users to add the content of http://localhost/wiki/index.php/Vorlage:Titel to any other page.
The standard installation is fine as far as it goes, but you will probably prefer to personalize your Wiki - by adding a logo of your own, a welcome text, and a modified skin, for example. You can complete part of this configuration directly in the Wiki, assuming you log in with the sysop account created previously, the other settings involve editing the LocalSettings.php configuration file created by the install. The configuration options are located in includes/DefaultSettings.php. If you want to change any of them, copy the values to your local settings and change them there, as DefaultSettings.php is overwritten by updates.
To add your own log, enter the path to the image file in LocalSettings.php:
$wgLogo = U
"/path/to/your/logo.png";
You can modify any text on the user interface directly in the Wiki. http://localhost/wiki/index.php/Spezial:Allmessages gives you a list of the pages in the MediaWiki namespace. Each page corresponds to a software message, such as Login successful.
MediaWiki 1.4 and later allows users to modify the interface settings in their own language. MediaWiki only imports the default language selection from the installation phase into the MediaWiki namespace; it references the languages directory for all other files. But you can modify messages directly in the Wiki as MediaWiki:Message/xx; replace xx with the ISO code for the required language.
MediaWiki messages also allow you to modify the links in the sidebar. The http://localhost/wiki/index.php/MediaWiki:Currentevents URL allows you to redirect the Current events link to a page more appropriate to your Wiki. You can use the MediaWiki:Portal and MediaWiki:Portal-url tags to assign a new title and address to your project portal. To prevent any user changing the interface arbitrarily, these features are restricted to users with administrative privileges.
Instead of creating a skin from scratch, you can use the MediaWiki namespace to modify the appearance of the page. In [[MediaWiki:Monobook.css]] and [[MediaWiki:Monobook.js]] you can modify many elements of the Monobook standard skin using CSS and Javascript. The corresponding [[User:Name/Monobook.css]] and [[User:Name/Monobook.js]] pages allow Wiki users to design their own personalized skins.
With the exception of the file upload feature, your Wiki installation is now completely functional. This is typically disabled for security reasons. To allow file uploads, remove the comment tags (#) in the # $wgDisableUploads = false; line. The web server process needs write permission for the images directory: the best way of doing this is to run chown to assign appropriate permissions to the user account under which the web server is running, for example, www-data for Debian.
You will definitely want to prevent PHP execution and the rendering of HTML files in the upload directory. The following lines in the Apache configuration file take care of that:
<Directory U
"/var/www/wiki/images/">
  php_admin_flag engine off
  AddType text/plain U
.html .htm .shtml .php
</Directory>
Only logged on users are allowed to upload files. To make sure that this works, use the Create account link, top right, to create a user account, or log on with the user account created by the install, WikiSysop. The page bar on the left should now show an upload form.
Mediawiki only supports a few file types by default. If you want to extend the list, you need to copy the values from the includes/DefaultSettings.php file to LocalSettings.php and extend that list. The following specifies valid file extensions:
$wgFileExtensions = U
array( 'png', 'gif', U
'jpg', 'jpeg', 'ogg' );
If you will be running your Wiki on a local network, behind a firewall, and with trusted users only, you can disable file type checking by specifying
$wgCheckFileExtensions = U
false;
Uploaded files are added to pages in a similar way to images: [[Image:example]] will add an image called example.png, for example. If you have installed ImageMagick or the PHP GD library, you can add a thumbnail to the page using the following syntax: [[Image:example|thumb|30px|description]]. Clicking on the thumbnail takes you to a special image description page where the image is described in full. Version 1.4 or later of Mediawiki supports the <gallery>, which places images in a neat gallery on a page:
<gallery>
Image:Landscape|<@15_Li_Pfeil_(U)>U
Description
Image:Sunset.png
Image:Yet Another <@15_Li_Pfeil_(U)>U
Image.gif
</gallery>
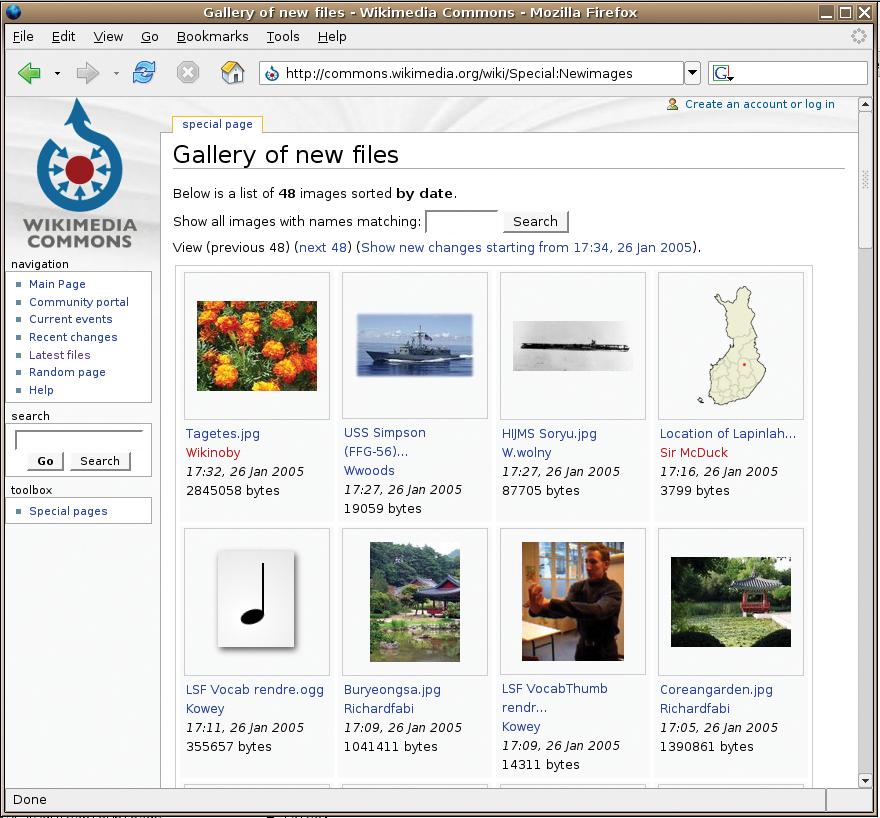
Mediwiki logs uploaded images and files in the searchable Image-Log (Figure 3).
You can add links for other files, which the browser can't render directly using [[Media:File.pdf]] - this tells Mediawiki to create a download link for the file.
| Table 1: Wiki Syntax | |
| ==Level 1== | First level heading |
| ===Level 2=== | Second level heading |
| ====Level 3==== | Third level heading |
| `'italic'` | Italic |
| `'`bold'`' | Bold |
| * Entry | Lines in unnumbered lists start with an asterisk (*) |
| # Entry | Enumerated lists |
| <\m> | Horizontal line |
| [[Title of new page]] | Internal link |
| [[Title|Other Text]] | Internal link with alternative text |
| http://example.com | External link (automatically converts to a clickable link) |
| http://example.com | External link with alternative text |
| [[Image:File.jpg]] | Add image to page |
| [[Image:File.jpg|thumb]] | Add thumbnail |
| {{Name}} | Dynamically integrate content on page "Template:Name" |
| {{subst:Name}} | Replaced by content on "Template:Name" when storing the page |
| {{:Name}} | Dynamically integrate content on page "Name" |
| ~~~ | Creates a signature for the logged on user, that is a Wiki link to a personal user page. |
| ~~~~ | Signature with time and date stamp |
Wikis started off life with two radically new ideas: on the one hand, there was simple editing, and on the other, the idea that anyone would be able to modify the pages of a Wiki - just like that, without logging on. Many popular Wikis, such as Wikipedia, the German parody Kamelopedia [4], or the WikiTravel [5] travel guide still uphold these goals.
These open Wikis are backed up by a community of volunteers who check new entries and changes, quickly removing spam, vandalism, and nonsense. Features such as version control and monitoring lists, which allow users to monitor changes to selected articles, make Mediawiki easier for operators to run open Wikis.
If you prefer to avoid cleaning up your own Wiki, you can promote other users to administrators. In the wacky world of Mediawiki rights management, only so-called bureaucrats can do this using the [[Special:Makesysop]] page. The account created at installation sets this flag.
Users with administrative accounts can delete pages, protect pages against editing by normal users - the link for doing this is in the bar at the top - and block notorious trolls on a special page, [[Special:Blockip]]. Entries here are free form; the software will accept numbers with the days, hours, weeks keywords, or even infinite for a lifetime ban.
By default, Mediawiki only allows administrators to block IP addresses. To block logged on users and IP address ranges, you need to add the following lines
$wgSysopUserBans = <@15_Li_Pfeil_(U)>U
true;
$wgSysopRangeBans =U
true;
to LocalSettings.php.
By now, spam is not only an issue for email users, it has also started to encroach into the Blogosphere - the world of blogs - and Wikis. If you intend to run an open Wiki, you might as well get used to checking your Wiki for spam, in the form of inserted links in this case, and removing the offending material.
To prevent linkspam, which is designed to improve the ranking of addresses in search engines, the developers introduced a $wgNoFollowLinks option to Mediawiki 1.4. This option is enabled for all Wikis by default. It tells Mediawiki to automatically assign the rel="nofollow" attribute to external URLs, preventing crawlers from evaluating links of this kind. Of course, this also affects legitimate links - to avoid this, you can set $wgNofollowLinks = false; to disable the option.
Another alternative is to use regular expressions to filter spam - Mediawiki will refuse to accept entries that match the regexp set in LocalSettings.php.
$wgSpamRegex = U
"/((http:\/\/(www\.|)U
(spammer1.com|U
spammer2.vu)/";
The usefulness of this method is restricted. Administrators need to update the configuration file after each incident and the list of blocked URLs can grow very quickly. It makes far more sense to enable the experimental SpamBlacklist Extension [6], which Wikipedia has been using since December. You can download the SpamBlacklist from the Sourceforge CVS repository for Mediawiki. The list allows administrators to manage a blacklist as a Wiki page. To avoid spammers removing their own addresses, you will want to lock the page to restrict editing to Wiki administrators.
All of these security measures are designed for open Wikis. If you don't have the time to check your Wiki regularly, or if you will be restricting your Wiki to a closed user group, you can limit write and read access and account generation in Mediawiki. The following lines in LocalSettings.php allow you to restrict write access, read access, and account generation:
$wgWhitelistEdit = true;
$wgWhitelistRead = U
array ( "Special:Userlogin", U
"Mainpage");
$wgWhitelistAccount = U
array ( 'user' => 0, 'sysop' U
=> 1, 'developer' => 1 );
The first line in this section restricts access to logged on users; the second line specifies which pages users who are not logged on are allowed to visit - you will at least want to allow anonymous visitors to view the login page, but you can also add more pages to the list of Wiki pages authorized for anonymous access if you wish. The $wgWhitelistAccount array allows you to specify users who are allowed to create new accounts - in this example, Wiki users need administrator or developer status to create new accounts. The three security settings I just described can be applied separately.
Mediawiki now includes a large collection of extensions and external utilities [8]. These extensions and utilities, which were developed primarily based on the requirements of the Wikipedia encyclopedia, include features such as timebars, hieroglyphics, the ability to add mathematical formulae in LaTeX syntax, a sheet music extension for Lilypond, and many other things.
If you do not have time to keep up with the changes you and the other users are making to your Wiki, you might like to check out the Enotif patch by Thomas Gries [9]. The Enotif patch adds configuration options to Mediawiki, allowing for email-based notification of users if pages on their watchlist change.
Most administrators will prefer to avoid time-consuming management tasks, such as modifying the links for a long list of pages or modifying texts. The PyBot [10]is a Bot framework written in Python for Mediawiki, which supports the simple creation of bots for special tasks.
| INFO |
|
[1] Wikipedia encyclopedia: http://en.wikipedia.org [2] Mediawiki: http://mediawiki.org [3] Mediawiki manual: http://en.wikipedia.org/wiki/Wikipedia:Manual_of_Style [4] Wikipedia parody, Kamelopedia (in German): http://kamelopedia.de [5] Wikitravel travel guide: http://wikitravel.org [6] Spam blacklist: http://cvs.sourceforge.net/viewcvs.py/wikipedia/extensions/SpamBlacklist/ and http://meta.wikimedia.org/Spam_blacklist [7] Stylesheets: http://meta.wikimedia.org/Gallery_of_user_styles [8] Mediawiki extensions and tools: http://meta.wikimedia.org/Category:AMediawiki_Extensions and http://meta.wikimedia.org/Category:MediaWiki_tools [9] Enotif: http://meta.wikimedia.org/Email_notification_(documentation) [10] Pybot: http://sourceforge.net/projects/pywikipediabot |